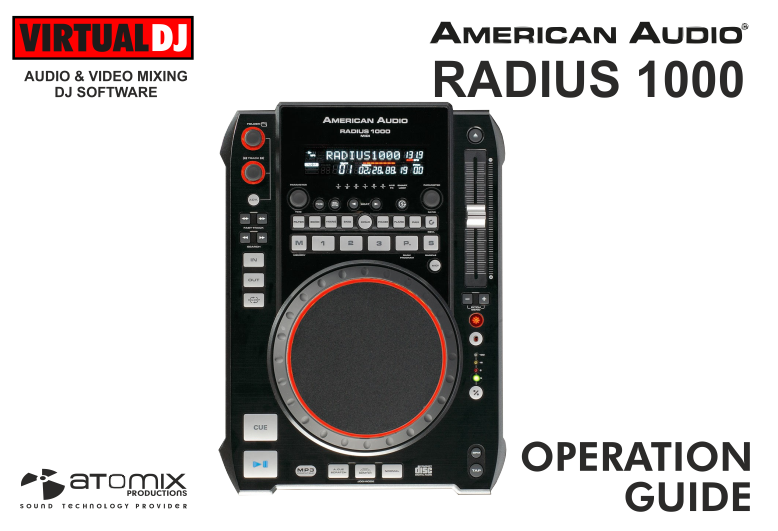
AMERICAN AUDIO RADIUS 1000
SETUP
No drivers is required to be installed nor a firmware update is available at the time this manual is written, however verify with the product’s webpage at http://www.adj.com/radius-1000 (Downloads tab)
VirtualDJ 8 Setup
Once VirtualDJ 8 is launched, a Login Window will appear. Login with your virtualdj.com account.
A Pro Infinity or a Pro Subscription License is required to use the American Audio Radius 1000.
Without any of the above Licenses, the controller will operate for 10 minutes each time you restart VirtualDJ 8.
http://www.virtualdj.com/buy/index.html

Connect your American Audio Radius 1000 unit(s) to your computer using the provided USB cable and power On the unit.
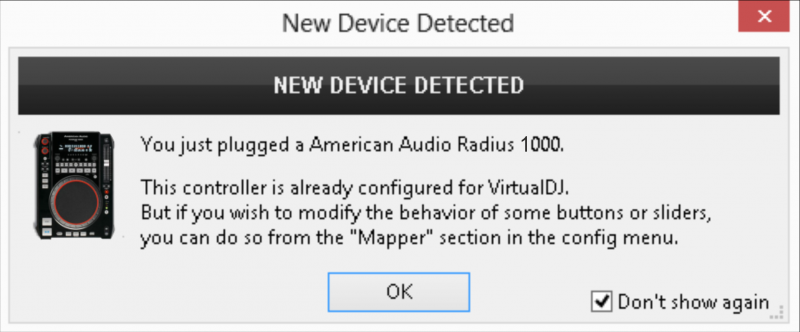
The unit is now ready to operate.
Advanced Setup
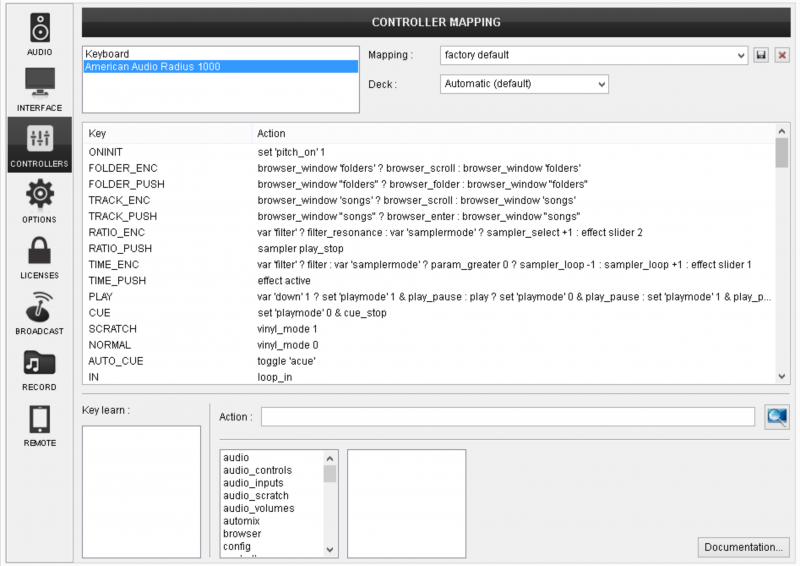
MIDI Operation
The factory default Mapping offers the functions described in this Manual, however those can be adjusted to your needs via VDJ Script actions.
Note. Each Radius 1000 unit (if more than 1 is connected) will be additionally displayed in this window, and any modifications in the mapping file will affect all units.
Find more details at
http://www.virtualdj.com/wiki/VDJ8script.html
AUDIO Setup
By default VirtualDJ will use the built-in sound card of your computer, but customized audio setups can be manually applied (see chapter E.Audio Setup Guide of VirtualDJ 8 manual)
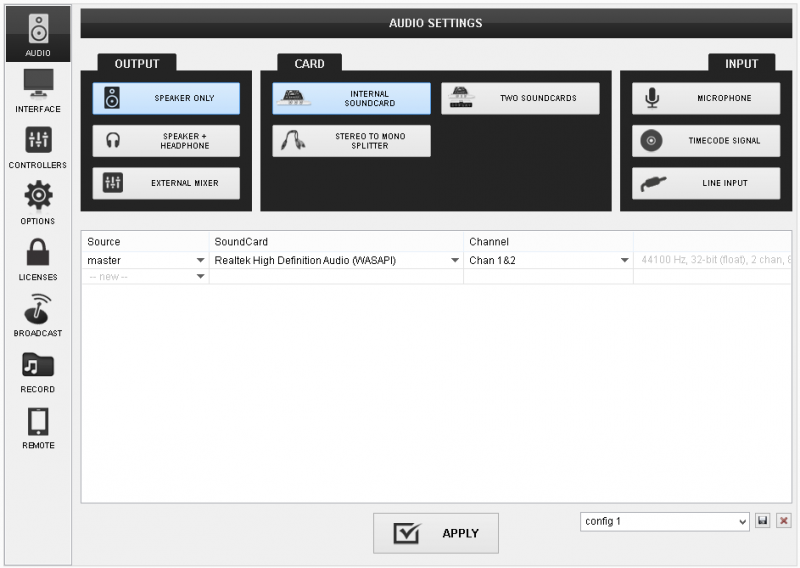
Please read the manual of the unit for further connections/capabilities and setups.
http://www.adjaudio.com/pdffiles/radius-1000-rev-march2010.pdf
For further VirtualDJ settings and features please refer to the User Guide of VirtualDJ 8.
http://www.virtualdj.com/manuals/virtualdj8/index.html
Layout
0. MIDI. Press this button to set the RADIUS 1000 to MIDI mode and allow to the unit to control a VirtualDJ deck. Notice that the unit will still be detected as a MIDI device, however it will not control any VirtualDJ operation if the unit is not on MIDI mode.
S. TAP. Press and hold this button to access secondary functions of other controls on the RADIUS 1000. While TAP is pressed, the LCD screen of the unit will display an additional “TAP” text

- PLAY. Plays / Pauses the track.
- CUE. When the Deck is paused, you can set a Cue Point by moving the Platter to place the Audio Pointer at the desired location and then pressing the Cue Button.
During playback, you can press the Cue Button to return the track to this Cue Point. (If you did not set a Cue Point, then it will return to the beginning of the track.).
If the Deck is paused, you can press and hold the Cue Button to play the track from the Temporary Cue Point. Releasing the Cue Button will return the track to the temporary Cue Point and pause it. To continue playback without returning to the Temporary Cue Point, press and hold the Cue Button, then press and hold the Play Button, and then release both buttons. - A.CUE. Press this button to enter the Jogwheel into the A.CUE mode. In this mode, each time you touch the jogwheel (the touch-sensitive part), the track will jump to the previously stored/used Cue point and will continue to scratch or bend from that position.
- SCRATCH. Press this button to set the Jogwheel to Vinyl (Scratch) mode. In this mode, use the outer part of the Jogwheel to bend (temporary speed up – slow down the tempo of the track) and the inner touch-sensitive part to scratch.
- NORMAL. Press this button to set the Jogwheel to or CD (Bend) mode. In this mode, use the Jogwheel to bend (temporary speed up – slow down the tempo of the track).
- JOG. Touch sensitive jogwheel. Use the jogwheel to scratch (in SCRATCH mode is selected), pitch bend (in NORMAL mode) or CUE jump (A.CUE mode). Hold TAP (S) down and then use the jogwheel to fast seek through the track.
The Jogwheel also offers Loop In, Loop Out and Loop Shift adjustment (see IN, Out and RELOOP buttons) - TIME. Use this button to cycle the Time Display format of the default 2 decks VirtualDJ GUI (Remain, Elapsed and Total).
Note: No time display or any other information is available for the LCD screen of the RADIUS (firmware limitation). - SGL/CONT. Use this button to enable/disable the Slip mode on the selected deck. When Slip mode is enabled several actions like HotCues, Loops and scratching with the Jogwheel will act temporary and the track will return to the position it would have been if the Slip mode was never enabled.
Note: The button is not offering any Led nor the LCD screen of the RADIUS offers any displays (firmware limitation), therefore the dedicated SLIP button on the default VirtualDJ GUI will indicate if the mode is enabled or not. - REV. Hold this button down to play the track in reverse. When released the track will continue to play from the position it would have been if the button was never pressed (censor).
While TAP(S) is held down, press this button to play the track in reverse but this time it will continue playing from the position that the reverse will be turned off. - EJECT. Press this button to unload the track from the deck
Hold TAP (S) down and then use this button to cycle though the available software decks* and assign the RADIUS 1000 to the selected deck. Notice that while TAP is held down, the LOOP led indicators will show which deck is assigned to each unit (starting from left decks 1, 2, 3, 4, 5 and 6).
*The available decks of the software will depend on both the offered decks of the GUI and the available decks that your hardware units offer.
PITCH

- BPM. (SYNC) Press this button to automatically match the corresponding Deck's tempo with the opposite Deck's (or the Master Deck’s if using a 4 decks Skin) tempo and phase. Hold TAP(S) down and then use this button to manually tap the tempo of the track
- PITCH RANGE. Press this button to select the next available range for the Pitch Fader (available values ±4%, ±8%, ±16% and ±100%).
The Leds above this button will indicate the selected pitch range. - KEYLOCK. Press this button to "lock" the track's pitch to its original key. The track's tempo will remain at the speed designated by the Pitch Fader.
Hold TAP(S) down and then use this button to link the pitch faders (Pitch Lock) of all available hardware deck. If Pitch Lock is enabled, the led of this button will blink and moving the pitch fader of this deck will also move at the same amount the pitch fader of all the available software decks. -
 Press this button to smoothly reset the pitch to its zero position. The Led of this button will blink fast while pitch is resetting, will stay lit if pitch is at the zero (middle) position and off if at any other position.
The Led of this button will also blink (with normal speed) if the software and the hardware pitch values do not match. This may happen e.g. if you assign the unit to a different software deck and the pitch value of this deck does not match to the hardware one, or if the SYNC is pressed.
You will then have to move the hardware pitch fader until it catches the software one and the led stop blinking (soft-takeover).
- PITCH BEND. Press and hold down these buttons to temporary speed up/slow down the song while pressed. When released, the track playback will return to the speed designated by the Pitch Fader.
- PITCH. Adjust the track's playback speed (tempo).
The actual pitch fader will not alter the pitch of the track if the actual pitch and the software pitch value do not match (software soft-takeover, ghost fader visible on the GUI). In most cases this may happen if SYNC is prior pressed or switching decks and the other deck is having a different pitch software value.
LOOPS
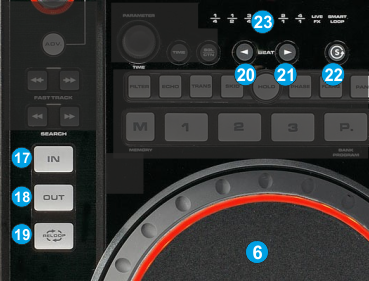
- IN. Press this button to set a Loop In (Entry point).
Hold TAP(S) down and then press this button to set the Jogwheel to Loop In mode and (fine) adjust the Loop In point using the jog (6) when a loop is enabled. The Led of the button will blink to indicate the Loop In Wheel mode. Press again to return the Jogwheel to Jog mode. - OUT. Press this button to set a Loop Out (Exit point).
Hold TAP(S) down and then press this button to set the Jogwheel to Loop Out mode and (fine) adjust the Loop Out point using the jog (6) when a loop is enabled. The Led of the button will blink to indicate the Loop Out Wheel mode. Press again to return the Jogwheel to Jog mode. - RELOOP. Press this button to exit a Loop if enabled or trigger the last used/saved loop if not (reloop).
Hold TAP(S) down and then press this button down to set the the Jogwheel to Loop Movemode and (fine) adjust the size of the loop using the jog (6) when a loop is enabled. The Leds of both the IN (17) and OUT (18) buttons will blink to indicate the Loop Out Wheel mode. Press again to return the Jogwheel to Jog mode. - BEAT <. Press this button to half the size (in beats) of the Loop.
- BEAT >. Press this button to double the size (in beats) of the Loop.
- SMART. Use this button to enable/disable the Smart Loop mode. If enabled, VirtualDJ will automatically adjust the length of the manual loop (using IN and OUT) to the nearest size in order a seamless (on beat) loop to be offered.
Hold TAP(S) down and then use this button to enable/disable the Loop Roll mode. If this mode is enabled the led right above this button will blink as an indication and the IN, OUT and RELOOP buttons will now offer temporary Loop Roll actions. - LOOP LEDS. These leds will indicate the size of the triggered loop in beats. Starting from left the leds will show sizes of ¼, 1/2, 1, 2 and 4 beats (the 3rd led ¾ is not used)
HOTCUES & SAMPLES
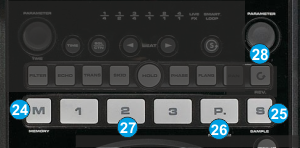
- MEMORY. Press this button to set the 3 numbered buttons (27) to HotCue mode.
- SAMPLE. Press this button to set the 3 numbered buttons (27) to Sampler mode. Press and hold this button for more than 1 second to open/close the Sideview and offer the Sampler View as well.
Hold TAP(S) down and then press this button to select and load the next available Sampler bank of VirtualDJ - BANK (P). Press this button to cycle through primary and secondary bank for the 3 numbered buttons
- CUE/SAMPLE (1-3). These buttons offer a different function depending on the selected mode and bank.
In HotCue mode (the M button is selected), the 3 numbered buttons (27) assign a Hot Cue Point (1 to 3) or returns the track to that Hot Cue Point. When a Hot Cue Button is unlit, you can assign a Hot Cue Point by pressing it at the desired point in your track. Once it is assigned, the Hot Cue Button will light. To return to that Hot Cue Point, simply press it.
Press and hold TAP(S) and then press a Hot Cue Button to delete its assigned Hot Cue Point.
Press and hold the MEMORY button and then press any of the numbered buttons to set a HotCue point on the fly (will not return the track to the assigned position).
If the secondary bank is selected ((P) led on), the 3 numbered buttons will offer similar functions as above, but this time they will assign/trigger/delete HotCues 4 to 6.
In Sampler mode (the S button is selected), the 3 numbered buttons (27) will trigger a Sample (1 to 3) from the selected Bank of VirtualDJ.
Hold TAP(S) down and then press a button to stop the corresponding sample (useful if the selected Sampler Trigger mode is set to Stutter or Unmute)
If the secondary bank is selected ((P) led on), the 3 numbered buttons will trigger a Sample (4 to 6) from the selected Bank of VirtualDJ. - RATIO. In Sampler mode, use this encoder to adjust the volume of the selected/triggered sample. Push the encoder to play the last triggered/selected sample.
Hold TAP(S) down and then use the encoder to half/double the size of the Loop (in beats) for the selected/triggered sample (if the sample is in Loop mode).
Hold TAP(S) down and then push the encoder to cycle through the available Sampler trigger modes (On/Off, Hold, Stutter and Unmute)
EFFECTS

- FILTER. Press this button to enable/disable the Filter effect on this deck.
- ECHO. Press this button to enable/disable the Echo effect on this deck
- TRANS. Press this button to enable/disable the Beat Grid effect on this deck
- SKID. Press this button to enable/disable the Backspin effect on this deck
- PHASE. Press this button to enable/disable the Phaser effect on this deck
- FLANGER. Press this button to enable/disable the Flanger effect on this deck
- PAN. Press this button to enable/disable the Reverb effect on this deck
- HOLD. Press this button to enable/disable the temporary effect mode. If enabled (led will blink), the triggered effects will act temporary (while pressed)
Note: If the HOLD button is held for more than 2 seconds, the unit will enter in HOLD mode and none of the functions will operate, until the same button is pressed and held again. - TIME. Use this encoder to adjust the 1st parameter of the selected/last triggered Effect. Hold TAP(S) down and then use this encoder to adjust the 3rd parameter of the same effect.
Push the encoder to open/close the GUI of the selected/last triggered effect. - RATIO (same encoder as 28). If the Sampler mode is not selected, use this encoder to adjust the 2nd parameter of the selected/last triggered Effect. Hold TAP(S) down and then use this encoder to adjust the 4th parameter of the same effect.
Push the encoder to open/close the GUI of the selected/last triggered effect
BROWSE & SEARCH
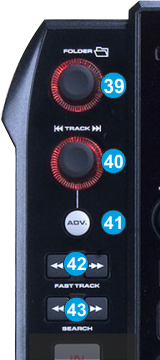
- FOLDERS. Use this encoder to scroll though the Folders list of the Browser. Push the encoder to open/close subfolders. If the focus is on the Folders list, the led of this encoder will be lit.
In Advanced Browser mode use this encoder to cycle through the available views of Sideview (Automix, Sidelist, Karaoke, Sampler and Clones)
Push the encoder to open close the Sideview
In prelisten mode use this encoder to control the progress bar of the Prelisten player. If the Prelisten player is paused, using this encoder will start the player.
Push the encoder to open close the Sideview - TRACK. Use this encoder to scroll through the tracks of Songs List. Push the encoder to load the selected track to the deck. If the focus is on the Folders list, the led of this encoder will be lit.
In Advanced Browser mode use this encoder to scroll through the tracks of the Sideview.
Push the encoder to load the selected track to the deck.
In Prelisten mode use this encoder to scroll through the tracks of the selected Browser window.
Push the encoder to play/stop the selected track to the Prelisten player.
Hold TAP(S) down and then push the encoder to set focus to the next Browser window - ADV. Press this button to enter the Advanced Browser mode. In this mode (led will be lit), both FOLDER and TRACK encoders will control the Sideview List of the Browser and both their leds will be lit.
Hold TAP(S) down and then press this button to enter the Prelisten mode. In this mode (led will blink), both FOLDER and TRACK encoders will offer prelisten controls and their leds will blink. - FAST TRACK. Use these buttons to move the loaded track forward/backwards by 16 beats (fast seek).
- SEARCH. Use these buttons to move the loaded track forward/backwards by 2 beats (seek).
